Python has a rich standard library that covers basic functionalities and common tasks in programming. This includes modules for file handling, system operations, networking, and simple web development, allowing you to accomplish many tasks without additional tools. However, for more complex or specialized programs, you often need external libraries. These libraries significantly extend the program’s capabilities, enabling advanced data analysis, machine learning, scientific computing, and other specialized functions beyond what the standard library provides.
Most external Python libraries are found in a repository called PyPI (Python Package Index). It hosts thousands of libraries that can be installed in Python using the package manager “pip.”
On the PyPI site, you can search for libraries using filters or by taking advantage of the organization into categories. The filters allow you to narrow down your search based on parameters such as programming language, license type, and compatibility with different operating systems. Additionally, the categories help you find libraries specific to certain fields like web development, data science, or machine learning, making it easier to locate the tools you need for your project.
Besides PyPI, many libraries, especially those related to data science and scientific processing, are found on Conda systems (AnaConda and MiniConda), which use “conda” as a package manager.
Besides PyPI, many libraries, especially those related to data science and scientific processing, are found on Conda systems (AnaConda and MiniConda), which use “conda” as a package manager.
The Conda libraries are available on both Anaconda Cloud and Conda-Forge, containing useful packages for data science, machine learning, and bioinformatics.
Once the necessary library is identified, it can be installed and used in your Python application using a terminal command:
pip install name_libraryor, in conda environment:
conda install name_libraryCompared to PyPI, Conda offers more robust dependency and environment management, especially for libraries that need to be compiled or have system dependencies.
To build a Python project, especially if it is complex or highly specialized, we need to find and install the specific libraries. In a Python project, there can be dozens or even hundreds of external libraries.
Some libraries need other libraries to function, and so on, creating dependencies and dependencies of dependencies (or transitive dependencies), which can make the system even more complex.
It may happen that two libraries installed on our system have common dependencies for the same library, but in different versions. This situation can cause a conflict known as “dependency hell,” where the system struggles to satisfy the version requirements for both libraries. As a result, it can lead to issues in the functionality or stability of the software, making it difficult to manage and resolve these dependency conflicts.
Other times, there are libraries that work only with specific versions of Python.
These situations can become unmanageable if we use the same Python installation for all the applications we develop.
For these reasons, it is strongly recommended to create a “virtual environment” for each project or group of similar projects to “isolate” the libraries and avoid conflicts. A virtual environment is an “isolated” system consisting of a version of Python and all the libraries needed for a project (or a similar group of projects). We can create a dedicated virtual environment for each project.
The virtual environment is easily replicable. It can be reconstructed and regenerated on another system, facilitating collaboration and application deployment. Additionally, the environments can use different versions of Python for different projects.
The first step is to create a virtual environment to ensure dependencies and packages do not interfere with the system-wide Python environment. Once the virtual environment is set up, activate it to work within this isolated setup. Activation ensures that any installations or changes are contained within the virtual environment.
There are various ways to create virtual environments: one option is to use venv, which has been integrated into Python since version 3.3; the other option is using conda.
# The venv command is

python -m venv environment_name

# the conda command is

conda create -—name environment_name python= 3.X
Once the environment is created, it can be activated for use:
# in windows

environment_name\scripts\activate

# con conda

conda activate environment_name

# in linux or MacOS

source environment_name/bin/activate
With the activation of the environment changes occur. One primary change is that the prompt itself is modified. Specifically, the name of the activated environment appears at the beginning of the command line. This visual cue reminds the user that they are working within a particular environment, ensuring that commands and operations are executed in the correct context.
The environment can be deactivated with the command:
deactivate

# or, with conda

conda deactivate
Each time a virtual environment is created, a dedicated folder for the environment is made in the directory from which the environment was created. Typically, this is the directory where we will develop our program. This folder contains several subfolders that house various components of the virtual environment. These subfolders include executables, libraries, and scripts necessary for the isolated environment to function properly. By organizing these components within a specific directory, it ensures that the dependencies and packages used in one project do not interfere with those used in another. This approach not only prevents conflicts but also makes it easier to manage and replicate the environment on different systems.
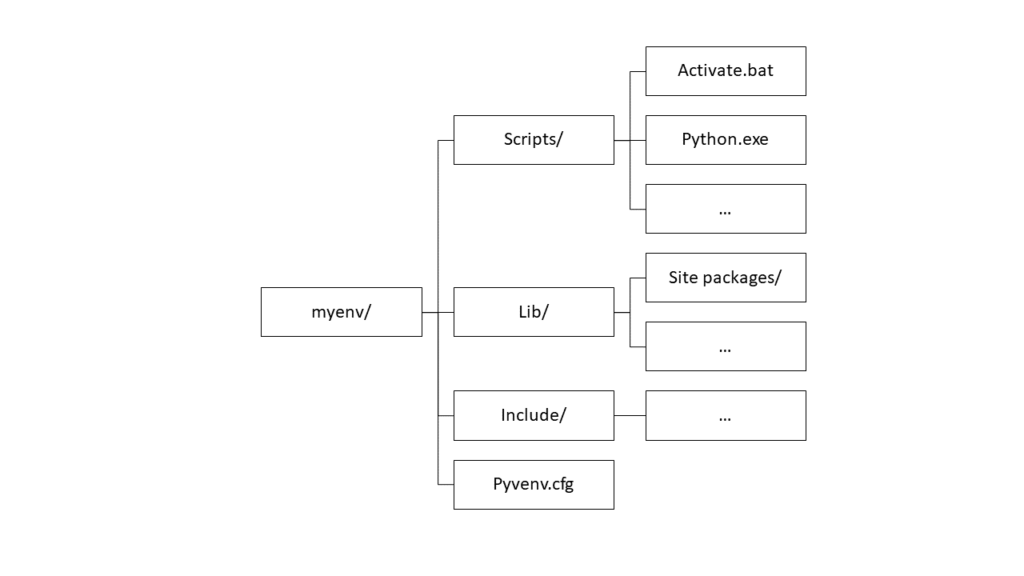
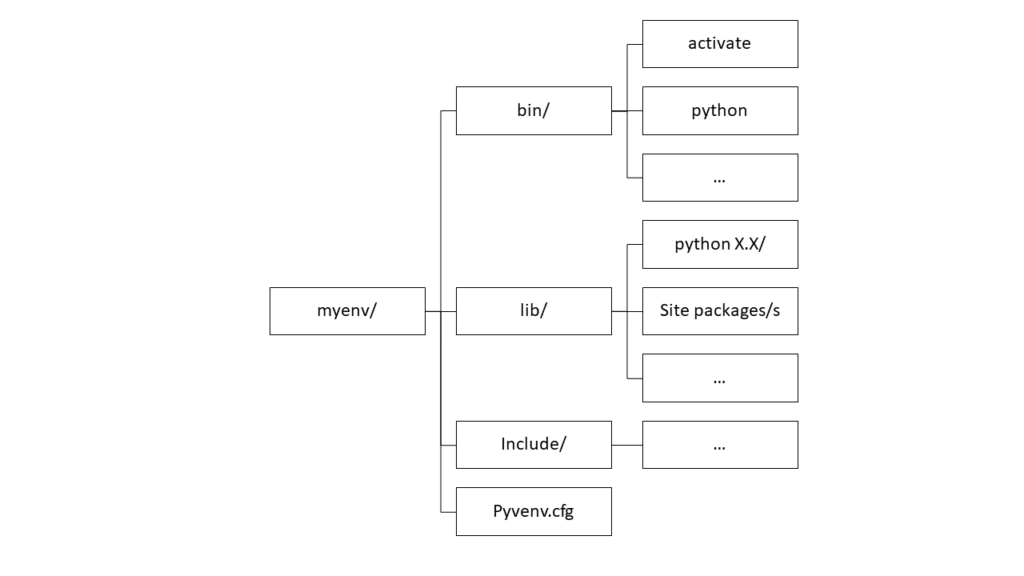
The structure of these folders varies depending on whether you use a Windows or Linux/Mac OS environment.
On Windows:

On linux or Mac OS:

The bin/ directory (in Linux/macOS) or Scripts/ (in Windows) contains the executables and scripts of the virtual environment, including the Python interpreter.
The lib/ folder (in Unix-MacOS) or Lib/ (in Windows) contains the libraries specific to the environment. In the site-packages/ subfolder, you will find all the installed Python packages.
The folders include/Include contain the header files for compiling Python packages that use the C or C++ languages.
pyvenv.cfg is a configuration file that stores information about the virtual environment.
Using Visual Studio Code as an IDE (Integrated Development Environment), you can issue commands directly from the integrated terminal window. Additionally, you can select the Python environment from the Command Palette. Access it through the menu by navigating to View and selecting Command Palette, or use the shortcut Ctrl+Shift+P. This flexibility allows for easy switching between different Python interpreters and environments, managing various projects and dependencies.
The creation of Python environments makes replication easy. To recreate a Python environment with all the installed libraries on another system, you first need a list of the libraries (including their versions) in the environment.
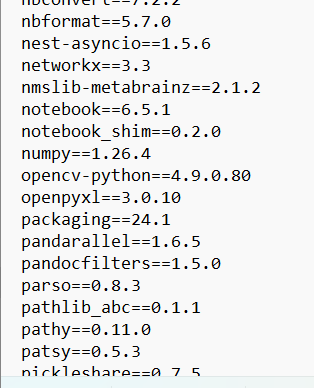
To do this, export the list of libraries and their versions to a requirements.txt file with the command:
pip freeze > requirement.txtThe structure of the requirements.txt file consists of a simple list of libraries and versions:

To replicate an environment on another system or after a reinstallation, create a new virtual environment, activate it, and install the libraries listed in the requirements.txt file.
# create e new virtuale environment

python -m venv new_env

# activate the new environment

new_env/Scripts/activate # in windows

source new_env/bin/activate # in linux MacOS

# intall all librarias listed in requirements.txt file

pip install -r requirements.txt
With Conda, the procedure differs slightly because a Conda environment can contain not only Python packages but also other configurations, such as dependencies required by different programming languages and various system libraries.
# Exporting environment dependencies

conda old_env export > requirements.yml

# Creation of a new environment using the exported dependencies

conda new_env create -f environment.yml

# Activation of the new environment

conda activate new_env
Essentially, the difference between replicating an environment with pip and conda is that conda uses the requirements.yml file, which includes system dependencies and other specifications. However, the purpose remains the same: exporting the configuration data of an environment and using it to recreate a similar environment.
